


Cockpit Gauge Controller
- Product Code: Controller
- Availability: 31
-
$100.00
Cockpit Gauge Controller
Screens sold separately
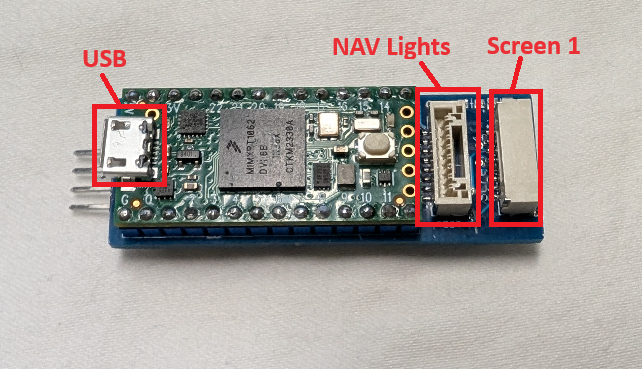
Click here for description of available power/data cables
Be sure to select the correct cable for your flight controller.
.1" connector - For Matek and other controllers with .1" headers
GH 6 pin connector - For SpeedyBeeF405Wing and most pixhawk controllers
GH 4 pin connector - So far the only flight controller that I'm aware of that uses this is the Roban X2 (if you know of another, let me know and I'll add it to the list)
Features
- Supports up to 4 screens
15 sizes available - from 0.71" to 4.0" - Screen Info
Each individually configurable, with multiple modes and instruments available - Multiple input options
MSP - Use serial port on flight controller - iNav, ArduPilot, BetaFlight (iNav supports most features)
SmartPort - Tap into SmartPort line between receiver and sensors
sBus - decodes servo channels and simulates the data based on stick positions
RC channels (2) - reads aileron and elevator position and simulates data - Fully functional moving map
Can be configured with waypoint, airports (real and model), runways, etc. - Controllable in flight from radio
Select navigation waypoints
Select ILS approaches
Select course on HSI/VOR
Zoom in and out of map
Change mode on screens
etc. - Navigation lights
Position lights
Strobes
Landing lights
Can use alternate function to show gear and flap positions - Frequent firmware updates to add new features
Comes with cable to connect to flight controller.
Cables are silicon coated and color coded (black, red, blue, green).
Be sure to check out the links in the information section below
If you would like your controller pre-configured, please put that in the comment section of the checkout page.
List what screen you want on each connector if you have different sizes. (i.e. - 2" screen on port 1, 1.54" on port 2, etc)
Also list what you want displayed on each screen. (2" instruments, 1.54" G1000, etc.)
Depending on how the screen is mounted, you might need to flip or rotate the image.
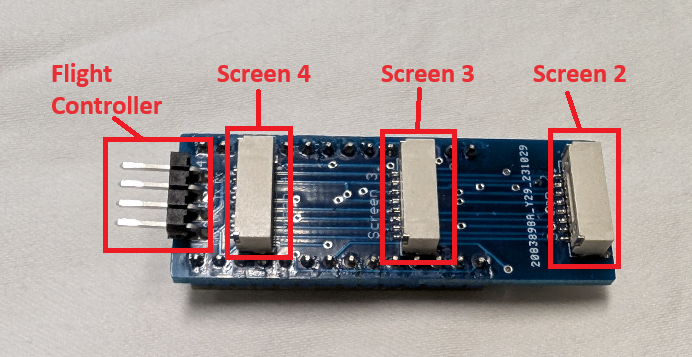
The controller will drive up to 4 screens at the same time. The screens range in size from 0.88" to 4.0" and resolutions from 128x128 to 480x320.
Data and power come from a flight controller running iNav, ardupilot or betaflight.
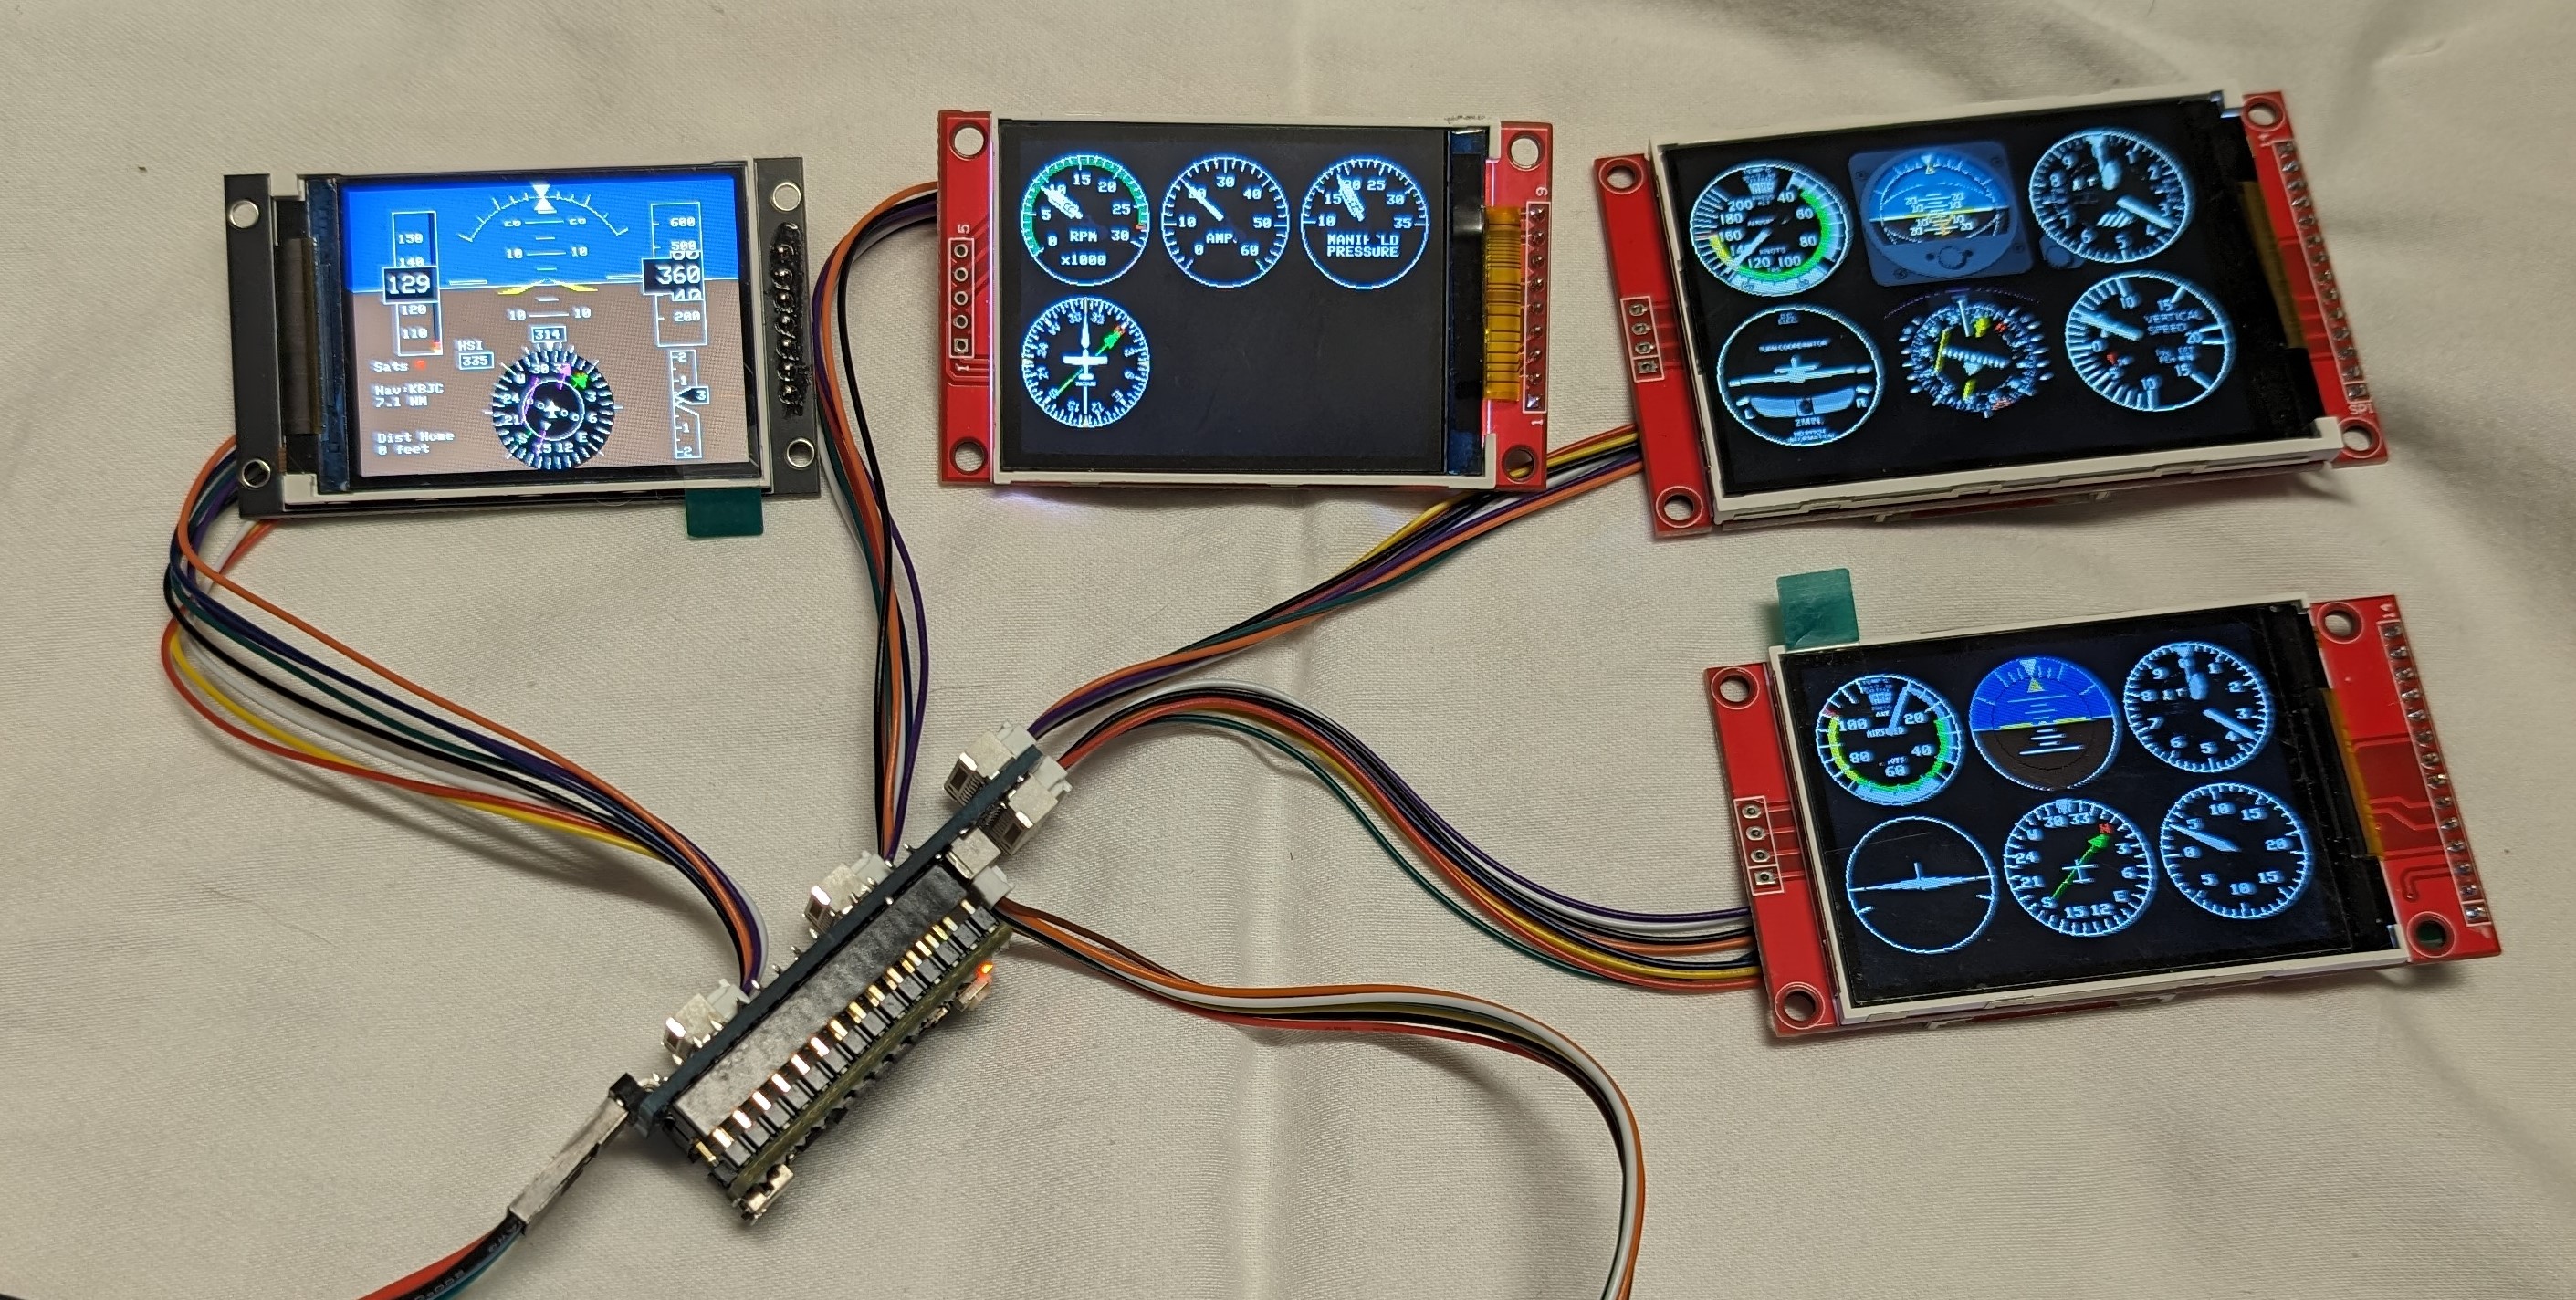
Everything works on all the instruments. Instruments include attitude indicator, air speed, altimeter, turn / bank, vertical speed, directional, HSI - localizer and glideslope, RMI, RPM (single or twin), amps, manifold pressure (throttle position).
Be sure the wiring is correct and plugged into the controller the correct way, or the microcontroller could burn up.
Requires flight controller running firmware that supports the MSP protocol and a free serial port.
(iNav supports the most features)
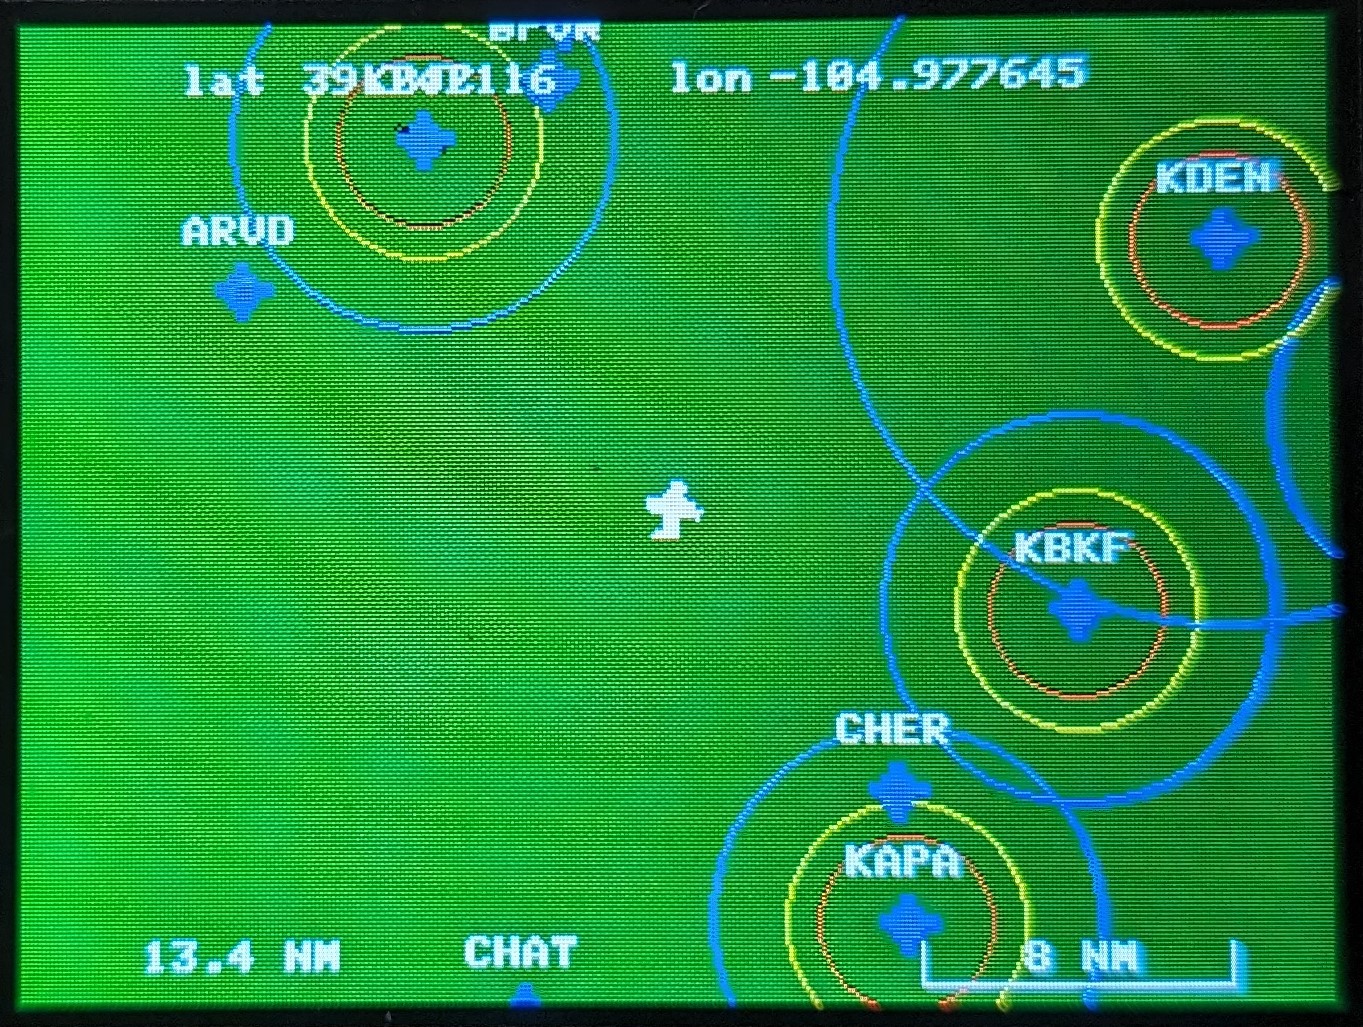
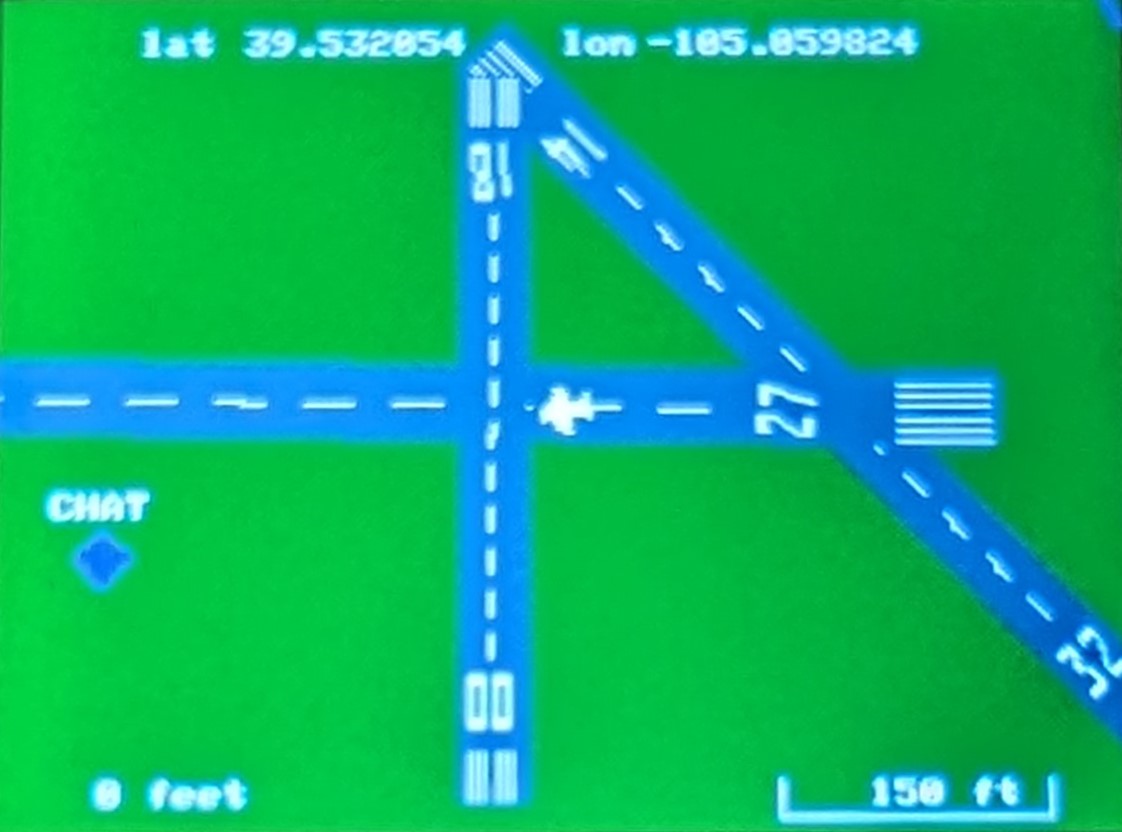
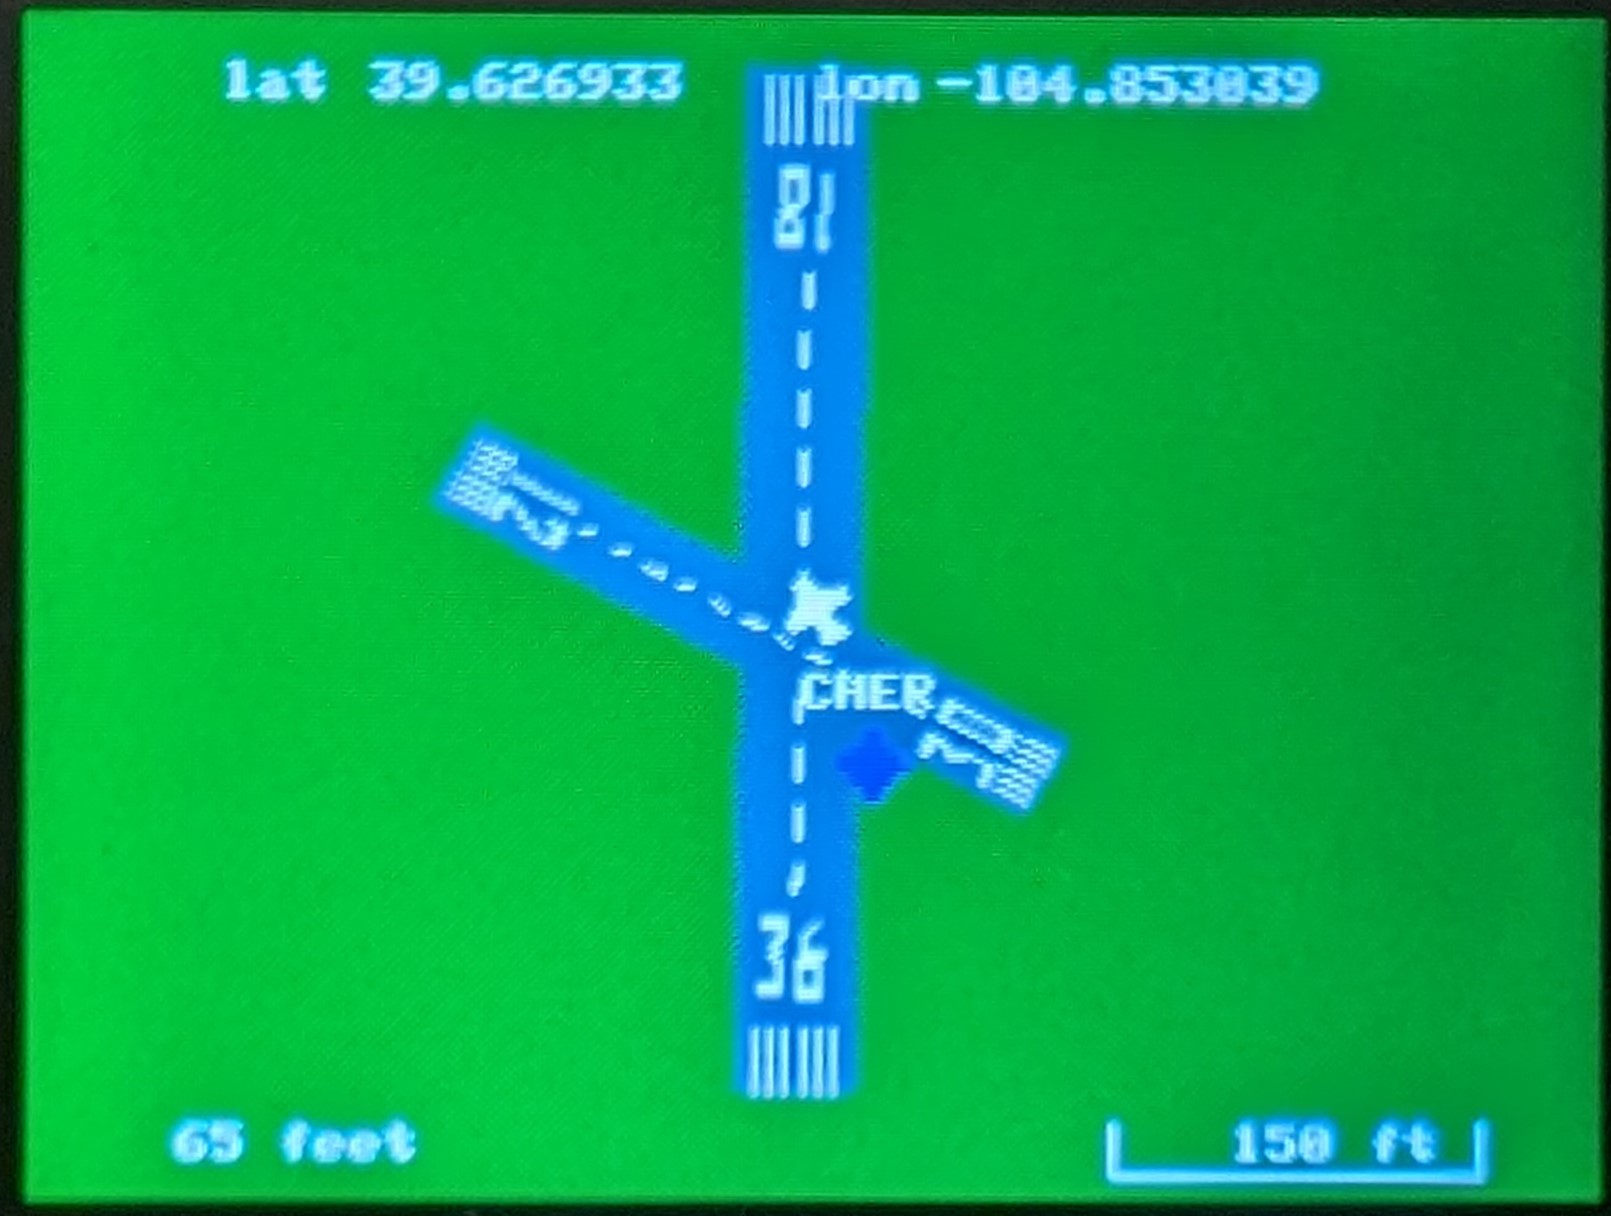
Moving Map
The coolest feature is probably the moving map with GPS position, distance to waypoint, airports, runways, VORs, airspace warnings, etc.
Navigation lights
With the optional navigation light board and LEDs, you can add lighting to your plane. This is similar to the Navigation Light Controller (that plugs into a servo port), except this one is run from the Gauge Controller board.
Simulator
The controller has a simulator built in and can be turned on and off (turn off before flying). Simulator needs a flight controller hooked up to send data to it. Moving the flight controller will show roll, pitch and yaw on the screens. Pitching up will slow the airspeed down and increase the altitude. Pitching down will do the opposite.
If a radio is connected to the flight controller, it will take the commands from the radio and you can fly around the map.
This simulator is turned on in the cli
Controllable from your radio
Through the CLI, you can set 2 channels from your radio to control the screens. The servo channels do not have to have physical ports on the flight controller, the signals come through the serial port.
1) RC analog channel can be used to select the HSI course to a waypoint or runway. If you select a runway and a course that is within 10 degrees of either end, it will lock onto it and become an ILS, with localizer and glideslope (default 3 degrees, but can be configured in the cli)
2) RC channel used to simulate button presses and set the nav lights.
Sending the following values will make the controller do the following:
- 900 uS - nav lights off
- 1000 uS - position/beacon lights on
- 1500 uS - + strobes
- 2000 uS - + landing lights
- 1100 uS - select previous vor/airport
- 1200 uS - select previous display (if you have more than 1)
- 1300 uS - change mode up (on selected display, change what is displayed)
- 1400 uS - map zoom in
- 1600 uS - map zoom out
- 1700 uS - change mode down (cycle the other direction)
- 1800 uS - select next display
- 1900 uS - select next vor/airport
Configurable through a cli.
Display driver and resolution can be selected and the image can be flipped or mirrored (so it can be installed the most convenient way) and colors can be inverted (some displays need it).
Each display can show one of 4 screens (G1000, moving map, instrument 1, instrument 2). The screens can be change from the radio during flight.
The instrument screens can be configured to show up to 6 instruments (from a selection of 16). The 2 instrument screens have their own layout and each display has it's own instrument layouts. 6 instruments can only fit on displays that are 320 pixels wide, other displays can only show 4.
You can enter waypoints for the moving map. These can be a model airfield, class B, C, D and uncontrolled airports, and virtual VORs.
Airports will display their airspace on the map. For class B, C, and D airport, it will flash Airspace on the screen when inside it.
It will also display a yellow ring where the ceiling is 100 feet and a red ring where the ceiling is 0 feet. (these 2 circles are approximate because those are unique for every airport).
Runways can be entered and will be displayed on the map. These can be any runway (real, model, virtual (like a park)). To enter a runway, you need the airport name, the runway name (the number), lat & lon of the center of the runway (this can be figured out on google maps), the direction of the runway (only need 1 direction, the other will be calculated), the length, the width and if it's a parallel runway, the letter (L, C, R)
Videos of gauges in action
Recordings from DJI camera
Related Products

1.54" screen
1.54 Inch Color TFT IPS LCD screen, 240 x 240 pixels All screens have an interface board and come w..

2" screen
2.0 Inch Color TFT IPS LCD screen, 320 x 240 pixels All screens have an interface board and come wi..

2.2" screen
2.2 Inch Color TFT IPS LCD screen, 320 x 240 pixels All screens have an interface board and come wi..

1.69" screen
1.69 Inch Color TFT IPS LCD screen*. 280 x 240 pixels All screens have an interface board and come ..

2.4" screen
2.4 Inch Color TFT IPS LCD screen, 320 x 240 pixels All screens have an interface board and come wi..

2.8" screen
2.8 Inch Color TFT IPS LCD screen, 320 x 240 pixels All screens have an interface board and come wi..

Navigation Light Board
This is similar to the Navigation Light Controller except this one plugs into the Gauge Control..

3.2" screen
3.2 Inch Color TFT IPS LCD screen, 320 x 240 pixels All screens have an interface board and come wi..

3.5" screen
3.5 Inch Color TFT IPS LCD screen, 480 x 320 pixels Can display 12 steam gauges All screens have a..

0.85" screen
0.85 Inch Color TFT IPS LCD screen, 128 x 128 pixels All screens have an interface board and come w..

0.96" screen
0.96 Inch Color TFT IPS LCD screen, 80 x 160 pixels All screens have an interface board and come wi..

4" screen
4.0 Inch Color TFT IPS LCD screen, 480 x 320 pixels Can display 12 steam gauges All screens have a..

1.9" screen
1.9 Inch Color TFT IPS LCD screen, 320 x 170 pixels All screens have an interface board a..

1.28" round screen
1.28 Inch Round Color TFT IPS LCD screen, 240 x 240 pixels All screens have an interface board..

1.47" screen
1.47 Inch Color TFT IPS LCD screen, 320 x 172 pixels All screens have an interface board solde..

0.71" round screen
0.71 Inch round Color TFT IPS LCD screen, 160 x 160 pixels All screens have an interface board and ..